韌體刷寫
本文件說明如何為微控制器 iHeater 編譯和刷寫 Katapult 啟動載入器。Katapult 允許通過 USB 更新 Klipper 韌體,在 iHeater 控制器上安裝 Klipper 韌體時也會使用到。
需求
- STM32F042F6P6
- iHeater 板
- ST-Link V2 程式設計器用於初始刷寫,或 USB 線
- Linux 系統,例如 Raspberry Pi 或 3D 印表機
如果無法直接在印表機上編譯和刷寫韌體
編譯 Katapult
- 複製 Katapult 儲存庫:
-
在
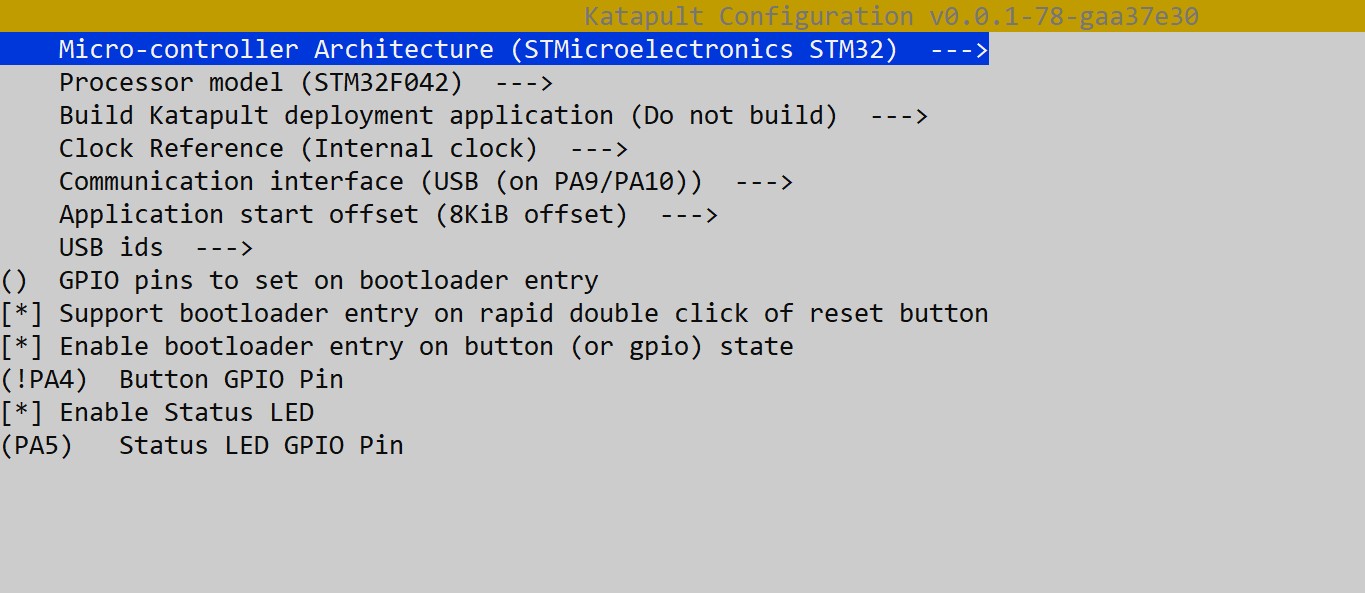
menuconfig中選擇: -
MCU Architecture: STM32
- Processor model: STM32F042
- Clock Reference: Internal
- Communication interface: USB (on PA9/PA10)
- Application start offset: 8KiB offset
- Support bootloader entry on rapid double click of reset button
- Enable bootloader entry on button (or gpio) state
- (!PA4) Button GPIO Pin
- Enable Status LED
- (PA5) Status LED GPIO Pin
- 編譯韌體:
韌體檔案將在 out/katapult.bin 處建立。
通過 DFU 刷寫 Katapult
此步驟只需執行一次,以寫入 Katapult 啟動載入器。
準備
安裝 dfu-util(如果尚未安裝):
設置 BOOT0 跳線帽並通過電源重新啟動板子或按 RESET。 微控制器將進入 DFU 模式。
檢查連接:
應該出現以下設備:
刷寫 Katapult
執行:
成功輸出範例:
Downloading to address = 0x08000000, size = 4968
Download        [=========================] 100%         4968 bytes
Download done.
File downloaded successfully
Transitioning to dfuMANIFEST state
移除跳線帽,按住 MODE 按鈕,按下並釋放 RESET 或重新連接 USB。
重新啟動後執行:
應該出現設備:
如果出現權限錯誤:
註記
- Katapult 佔用 Flash 的前 8 KB,因此 Klipper 中必須指定 8KiB 偏移。
- 可以通過雙擊 RESET 或 GPIO 按鈕 (PA4) 進入 DFU 模式。
- PA13/PA14 用於 SWD。
- 刷寫 Katapult 後,不再需要 ST-Link 程式設計器;後續更新可通過 USB 執行。
在 iHeater 上安裝韌體
編譯韌體
在設定功能表中選擇:
Enable extra low-level configuration options

Micro-controller Architecture (STMicroelectronics STM32)

Processor model (STM32F042)

Bootloader offset (8KiB bootloader)

Clock Reference (Internal clock)

Communication interface (USB (on PA9/PA10))
停用所有未使用的選項:
[*] Support micro-controller based ADC (analog to digital)
[ ] Support communicating with external chips via SPI bus
[ ] Support communicating with external chips via I2C bus
[*] Support GPIO based button reading
[ ] Support Trinamic stepper motor driver UART communication
[ ] Support 'neopixel' type LED control
[ ] Support measuring fan tachometer GPIO pins
    *** LCD chips ***
[ ] Support ST7920 LCD display
[ ] Support HD44780 LCD display
    *** External ADC type chips ***
[ ] Support HX711 and HX717 ADC chips
保存設定並退出功能表。
編譯韌體
結果應顯示
在 iHeater 板上安裝韌體
如有需要,安裝 python3-serial
下列步驟假定 Katapult 啟動載入器已安裝。
-
將 iHeater 連接到主機的韌體模式:連接 USB 時按住 MODE 或雙擊 RESET。
-
找尋設備:
應該出現類似:
- 如有需要,安裝
flashtool:
- 將設備 ID 替換為您的並執行:
python3 ~/katapult/scripts/flashtool.py -d /dev/serial/by-id/usb-katapult_stm32f042x6_XXXXXXXXXXXXXXXXXXXXXXXX-XXXX -f ~/klipper/out/klipper.bin
預期輸出:
Flashing '/home/pi/klipper/out/klipper.bin'...

[##################################################]

Write complete: 20 pages

Verifying (block count = 319)...

[##################################################]

Verification Complete: SHA = 8A3DDF39A0E70B684DC6BAF74EF8F089EBDD6C18

Flash Success
- 檢查:
輸出應為:
iHeater 已準備好與 Klipper 配合使用